
Installing OpenClaw on a $329 Windows Mini PC
My journey and guide to setting up OpenClaw on a Beelink SER5 Max (R7 6800H | 32 GB RAM)

I’ve been a long-time subscriber of ETA PRIME and Robtech because of their in-depth mini PC reviews. The more I watch them unbox these adorable tiny boxes, the more I wanted to get one myself. But I always found it to be more of an impulse buy as an someone who built and still use a fairly small powerful desktop with Mini-ITX motherboard. I also felt these affordable computers were a risky buy. What if they break after warranty? What if a certain part like a power supply needs a replacement? For that reason, I’ve mostly avoided the temptation.
Table of Contents
Prologue — Bees and… Lobsters?

My views slowly began to change last year in 2025 as more mini PC reviews continued to pop up on my timeline even from the likes of NAS Compares and Level1Techs. These enthusiasts started to see the appeal using Mini PCs as servers or homelabs. Special shoutout to those guys for convincing me to give them a second look.
Out of curiosity, I checked a local online retailer as they sell several Beelink mini PCs and lo and behold, I found an attractive option — the Beelink SER5 Max for the low price of Php 18,995 which converted to around $329 at the time.
The Appeal of the Beelink SER5 Max
On paper, the Beelink SER5 Max, is like the epitome of a great price-to-performance ratio computer. It has an 8-core, 16-thread AMD Ryzen 7 6800H, a 1 TB SSD, and most importantly, a whopping 32 GB of DDR5 RAM. Sure, the Ryzen 7 6800H is pretty dated, but 8 cores are 8 cores! The RAM was the real highlight as it offers a lot of headroom for running numerous server applications. Think Docker containers, self-hosted tools, rudimentary NAS features… exciting! And because of the low price, the overall risk is far lower compared to say a high-end Beelink SER10 Max AI which costs about 4 times as much. Those Mini PCs are real head turners, but I wanted to be practical and just start with a small humble server for managing my CCTVs and maybe tinker with a few Docker containers. And it worked well!
The Allure of AI
But wait what? Beelink SER10 MAX AI? I love using Google Gemini Pro and Claude and even dabbled with some local models like Qwen3-8B on my desktop with 64 GB of DDR4 RAM and basic NVIDIA GeForce RTX 3050 6 GB. I always thought local models required discrete GPU power to perform optimally. Then after watching Alex Ziskind, I learned that mini PCs could have a taste of the action too! But I wasn’t so keen on setting that all up because I was more than happy with my Gemini Pro subscription.
Then recently, I learned that Beelink is selling mini PCs with OpenClaw pre-installed. I saw plenty of hype surrounding OpenClaw over the past few weeks and seeing the autonomous agent making its way to mini PCs really got me thinking… could my Beelink SER5 Max run an AI agent OpenClaw too?
The Attraction of OpenClaw
So, what’s the big idea with OpenClaw? I watched a few videos and honestly, I didn’t quite get the appeal. According to their official GitHub page, OpenClaw is a personal AI assistant that runs entirely on your computer and can optionally connect to the Internet if you prefer it rely on cloud-hosted LLMs like your usual ChatGPT, Claude, and Gemini models. The assistant features built-in integration with top messaging platforms like WhatsApp, Discord, Slack, Telegram, iMessage, Google Chat, Microsoft Teams, and several others so you can pick your favorite interface or frontend and use it to carry out computer operations as if you are instructing an actual person. Intriguing!
Preparing to… “Exfoliate”
After reading OpenClaw’s system requirements it looks like my Beelink SER5 Max could work! But could it run well? Join me through my journey of installing OpenClaw on the Beelink SER5 Max!
I. Disclaimers and Disclosures
Before I dive into the exciting stuff, I want to disclose a few things as I intend to build a long-term relationship with you, the reader, especially if you plan on subscribing.
Beelink
My decision to document this journey of installing OpenClaw on my Beelink SER5 MAX stems from a giveaway Beelink announced back in March of 2026. Not only did they announce some Mini PCs that have OpenClaw preinstalled, but they also launched a competition encouraging folks to create OpenClaw installation guides to spread awareness. While this particular guide serves as my official entry, I really had plans to install OpenClaw on my Beelink in the past, but never got around to it because of work. So this contest simply convinced me to do it sooner and document the journey as well.
I’ve had my Beelink SER5 Max since late September of 2025. I bought it with my own money and other than my intent to join the competition, I am not affiliated with Beelink in any way and they had no inputs in any portion of this article. This is 100% my own experience and certainly not AI-generated.
OpenClaw
I am not affiliated with OpenClaw either and not even part of any OpenClaw community. In fact, I never used or even installed OpenClaw prior to the creation of this guide. Bold admission, right? Well, I think a “blind installation” of OpenClaw is part of the fun because even with an elaborate installation guide, people apparently run into issues. I’m sure all the other folks who make guides and video will put their own optimal spin on things, but I want to take more of a storytelling approach so you can witness in great detail if this is the best approach for installing OpenClaw for your use case.
My role here is to simply fill in any potential blanks and give a raw insight of what it is like to install on my Windows-based machine.
I’ll be following the official OpenClaw Getting Started guide from the OpenClaw docs website and I think you should too because objectively, that will be your most updated source and gives you the full breakdown of installation options. My role here is to simply fill in any potential blanks and give a raw insight of what it is like to install on my Windows-based machine. Your experience may slightly differ from mine especially if you are reading this well into the future. Always check for any important security-related announcements or additional requirements before following these steps in case the latest OpenClaw version evolves.
So with that out of the way, let’s take a closer look of my guinea pig of a computer!
II. Background Check
I understand not everyone has a mini PC like mine, but one of the main goals of this OpenClaw expedition is to discover exactly where computers with similar specs stand. Like if it runs well on my computer, then it could potentially run on your laptop or perhaps a slightly underpowered aging computer. Will break things down to the technical level like CPU and RAM usage. This will be my first time doing this so bear with me. We will all learn together and improve and will make any appropriate edits if necessary.
Test System Overview
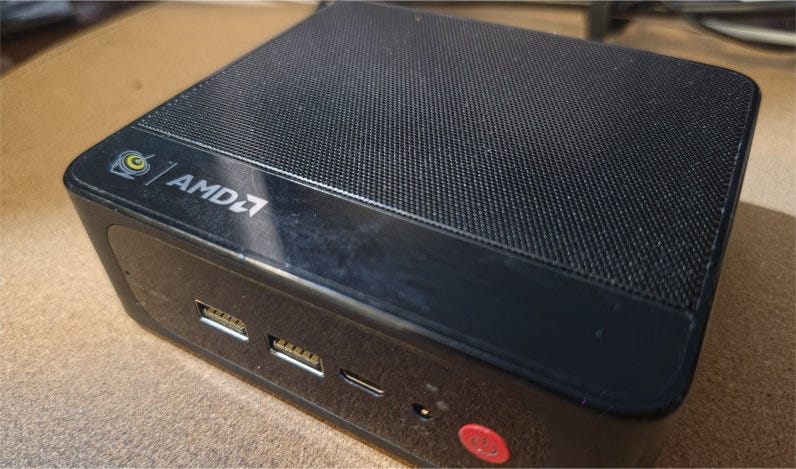
So to reiterate, my test system is the Beelink SER5 Max with an AMD Ryzen 7 6800H CPU with 32 GB LPDDR5 6300 MHz memory. At the time of writing, my local store no longer sells it, but Beelink offers plenty of other mini PCs with all sorts of configurations.

They even had a 24 GB version, but I went for the 32 GB because the dual-channel memory is soldered meaning non-upgradable. Plus, more RAM is always better and your operating system will eventually find an excuse to use as much as it can so doesn’t have to bother your SSD so much for swap file shenanigans. I was lucky enough to buy this before the memory prices spiked so if you manage to spot another 32 GB computer under $400, I say snag it!
About that CPU (*ahem* APU)
The AMD Ryzen 7 6800H was my second reason for considering this PC as I watched countless reviews of laptops sporting this processor and how it was a speed demon and integrated graphics leader at the time. The RDNA 2-based AMD Radeon 680M integrated GPU features 12 compute units making it a great choice for indie games and super old AAA titles. If you are going to use it as a Plex server, the integrated GPU could also do some hardware transcoding although it won’t be as good as Intel’s QuickSync. Yes, I know OpenClaw will be our main use case, but you are going to get tempted to run other stuff once you are finished configuring OpenClaw with all that memory to play with!
But regarding the Beelink SER5 Max specifically, this processor is a bit more complicated and I only found out after I purchased the computer. Beelink offered SER5 Max configuration with an older 5800H processor, but with a TDP of 54 watts. This means that the 5800H could perform faster than most other computers with the same processor because its components, cooling solution, and chassis can handle the extra juice. Heat is the enemy of a CPU and too much heat will force it to throttle or lower its clock speed to prevent an abrupt shutdown.
But this SER5 Max I got only has a TDP of 28 watts which somewhat limits the performance especially when gaming. This already gives me the impression to setup OpenClaw with a cloud model as the low-wattage CPU may bottleneck the performance of local LLMs. So when shopping for a cheap laptop or mini PC, do some extra research on the CPU side. Yes, I felt a little deflated knowing the Ryzen 7 6800H is a bit gimped, but considering the price I paid, I’ll give Beelink a pass.
Upgradability
One of the downsides of getting a ridiculously cheap mini PC is the lack of potential upgrades. With the Beelink SER5 Max specifically, the only things you can upgrade are the storage and Wi-Fi card. That technically gives this computer a leg up compared to a more capable Mac Mini, but the other major feature that’s missing is a USB4 or Thunderbolt port. This means that you cannot add an external GPU to the Beelink SER5 Max which could vastly expand the OpenClaw’s capabilities especially if you plan using local LLMs. RAM as I mentioned earlier, is non-upgradable.
Operating System: Windows 11
I installed Windows 11 on my Beelink SER5 Max for three main reasons: 1.) I use Blue Iris as my NVR software for managing my security cam which has no Linux port and 2.) I use the computer as a client device in case I want to do some experiments without affecting all the server-hosted stuff and 3.) I never tried Proxmox and prefer the comfort of WSL2 which OpenClaw recommends you use for installing on a Windows platform. This setup isn’t the most optimal performance-wise, but in my opinion, should be the most beginner-friendly which is key if you want to do any skinny dipping with OpenClaw.
Keeping Things Up to Speed
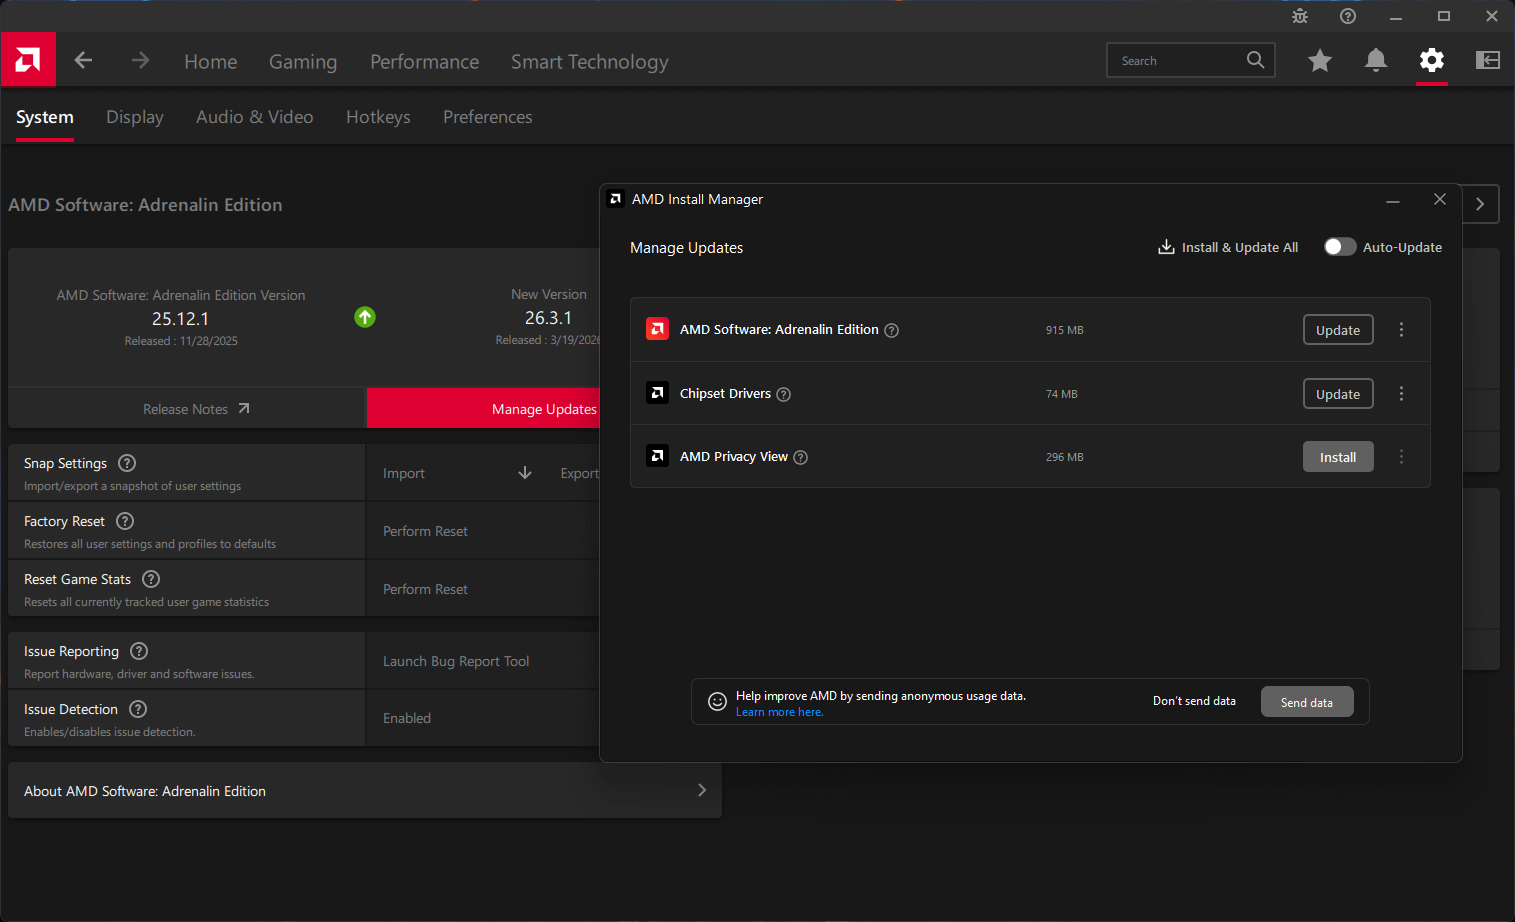
So before we invite the cute lobster to our test system here, I recommend you do the usual Windows and drivers updates. Installing OpenClaw requires a bit of command-line dabbling so you don’t want your computer to give you any excuses for failure. Launch Windows Update and snag all the security updates and latest non-preview build. OpenClaw posts many new builds every week so I can imagine the latest stable build plays nice with the latest Windows build. At the time of writing, I’m using Windows 11 25H2 build 26200.8246.
Head to your manufacturer’s driver page too or use the brand’s built-in driver updater tool if any to retrieve the latest drivers. Beelink users can simply go here and pick the folder and subfolders that exactly match your Beelink model.
Declutter and Optimize (and Backup if you can!)
If you browse around OpenClaw docs website, you will notice the lack of a hardware requirements page. That’s because OpenClaw technically runs on a potato, but the performance will be horrible in most cases. With a more powerful computer like the SER5 Max, your experience will vary depending on your use case so you should make sure your system has as much system resources as possible.
OpenClaw loves bytes and when I mean bytes, I mean the available RAM on your computer and storage. Therefore, before installing OpenClaw, you should uninstall any unnecessary apps in your computer, delete any bulky files you don’t need, and check the Startup apps section in the Task Manager so you can uncheck any apps you might not need to launch on startup. Good tools I recommend for clearing space are BleachBit and WizTree. I also recommend Autorun Organizer which can list other Startup apps that don’t appear in the Task Manager while having a friendlier interface than Autoruns.
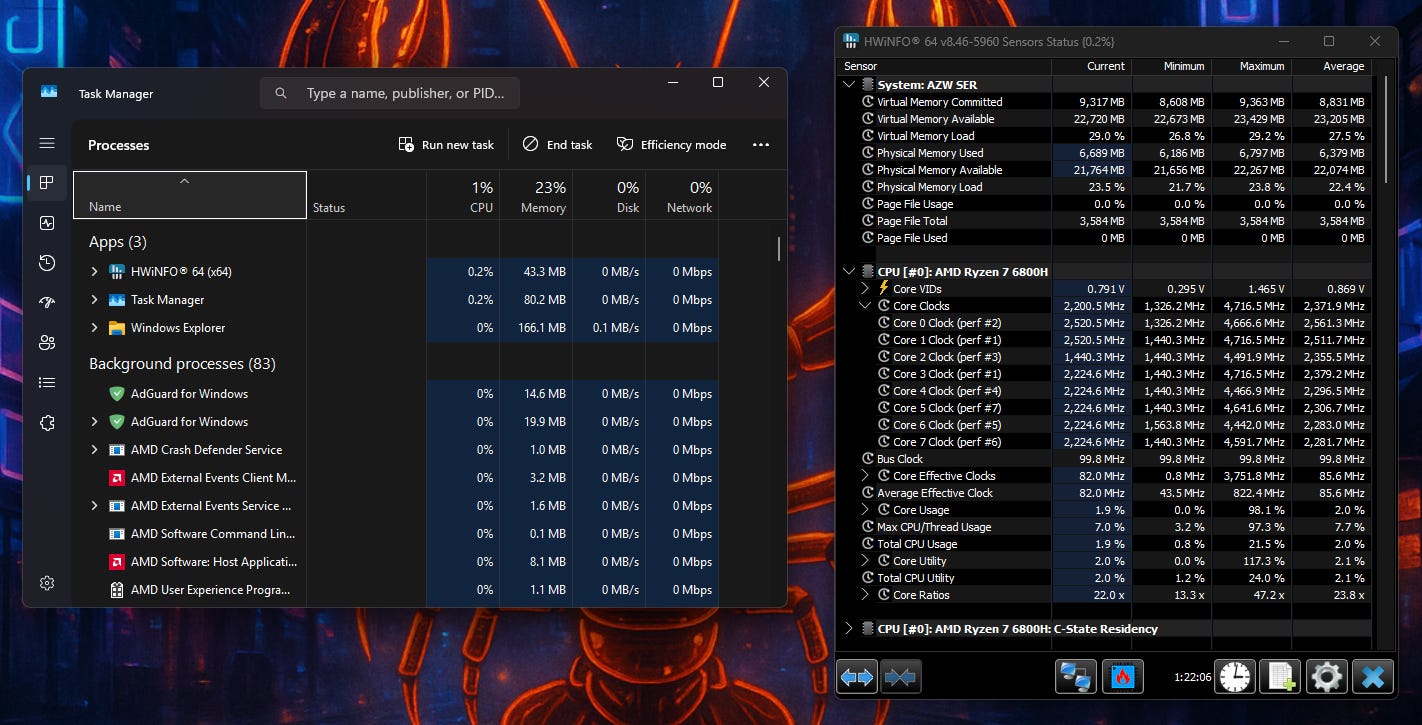
Windows uses about 6 GB of memory if you don’t have many apps installed
Once you finished your digital maintenance chores, restart your computer, launch Task Manager, and leave it on idle for a few minutes while monitoring the CPU and Memory usage. You should be good to go if you notice the CPU usage in the 1% to 5% range while Windows uses about 6 GB of memory if you don’t have many apps installed. While the entire installation procedure shouldn’t mess with your settings or personal files, I still recommend you backup your most important files and settings using your favorite backup software or service just in case.
An Extra Note for Beelink Users
One of the first things I did after setting up my Beelink SER5 Max is perform a couple of benchmarks to make sure the APU runs okay. The results were a bit below average or at least under the advertised figures so I did some research and discovered the TDP limitations of the 6800H. I also learned that Beelink rolled out an official BIOS update that somewhat improves both CPU and GPU performance, but I had to contact Beelink’s official support email to get it. Fortunately, they replied really fast which is always a positive for me and after installing the BIOS update, I did get slightly better benchmark results . So if you buy a Beelink computer yourself, always contact the support channel and give the exact model of your mini PC so you get the appropriate BIOS which could bring out the best OpenClaw performance possible.
II. Installing WSL2 in Windows 11
If you already have WSL2 installed or use Mac or Linux, you may skip this section. Then OpenClaw developers optimized OpenClaw for Linux environments which is why they recommend Windows users install on WSL2 even if it relies on a virtualization for the Linux kernel. If you have never done this before, don’t worry because it isn’t very difficult.
I recommend using Windows Terminal for this step so you can easily copy/paste the commands. It also sets the tone for OpenClaw since installing relies on the command line as well.
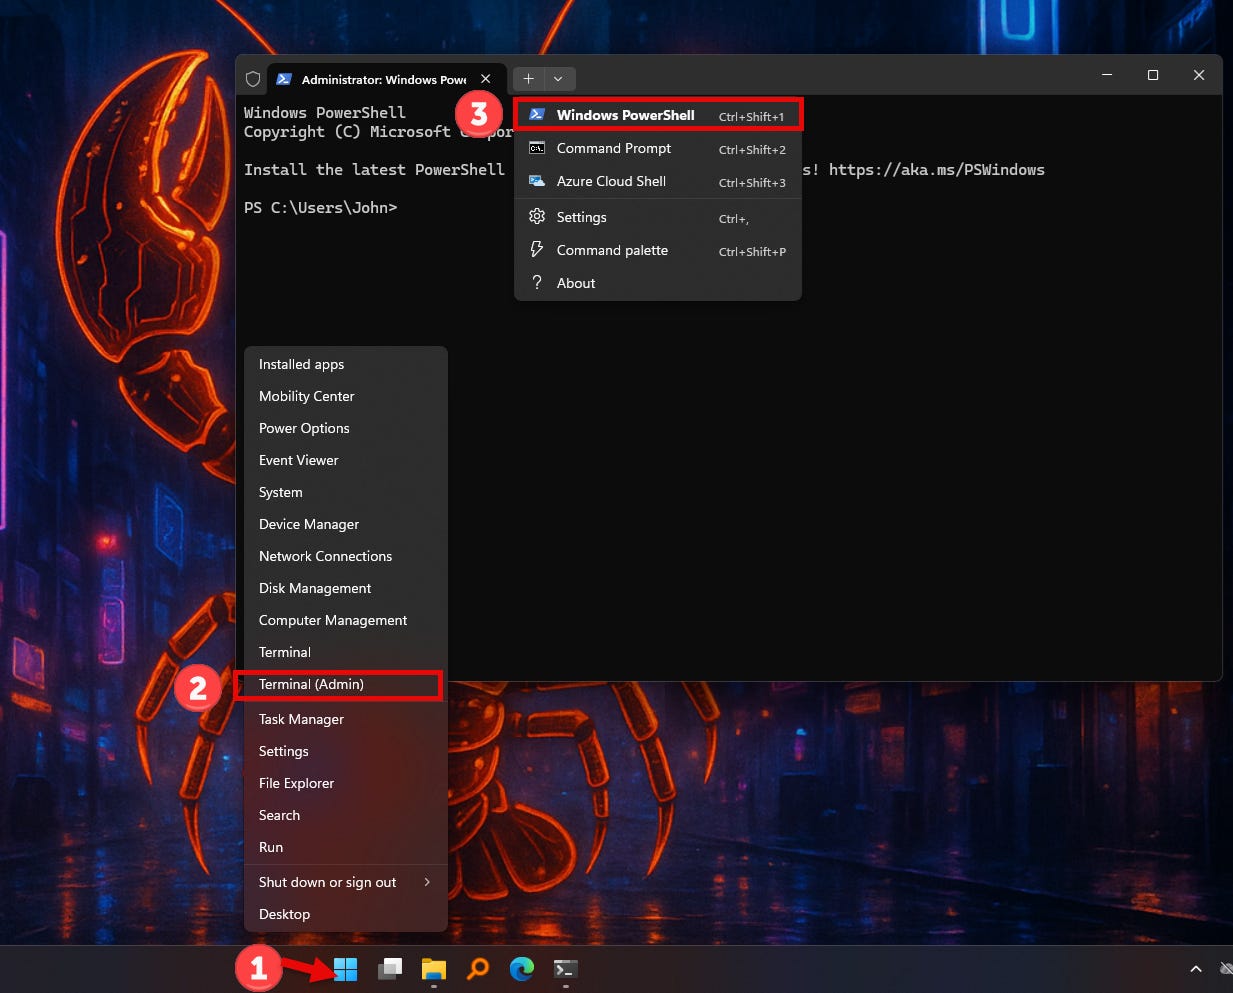
Right-click the Start button. Or you can search for Windows Terminal using the Search feature
Click Terminal (Admin). Or you can right-click the Windows Terminal entry on the Start menu and click Run as administrator.
If you don’t see a “PS” prefix on the Terminal, click the drop-down arrow on the title bar and select Windows PowerShell.
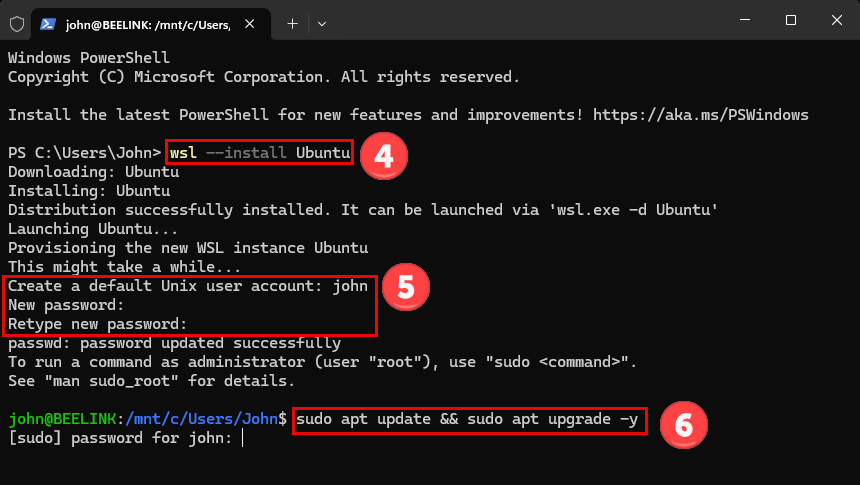
In the Windows Terminal, enter the following command to install WSL2 and Ubuntu as it is the most practical distro to use with OpenClaw.
wsl --install Ubuntu
If you never installed WSL2 before, Windows will likely update it to the latest version so be sure you have a stable Internet connection.
Create your default user account. I would just stick with the suggested name there. This should change the prompt Ubuntu!
Enter the following command at this new prompt and key in the password you set earlier.
sudo apt update && sudo apt upgrade -y
Wait for Ubuntu to safely upgrade the packages and we’re in the clear! Don’t close Windows Terminal just yet! But in case you did, you can always return by launching Ubuntu from the Start Menu.
III. Installing and Setting Up OpenClaw in WSL2
Now we can finally proceed to the installing OpenClaw and if you followed the steps in order, you can still use the same Windows Terminal session since you’ll be typing more commands.

Create a folder called workspace or any name you want using the following command as it will serve as the path for downloading OpenClaw.
mkdir workspace && cd workspace
Copy and paste the following command to start the OpenClaw installation.
curl -fsSL https://openclaw.ai/install.sh | bash
The OpenClaw installer will install the required dependencies and install the latest version of OpenClaw (in my case, it is v2026.4.23). You will be asked to enter your password again. Then just sit back and let the installer finish the three-phase procedure. After seeing the “OpenClaw installed successfully” message, you should notice a “Starting setup” for about a minute or two. Don’t panic and just patiently wait for the Security disclaimer to appear as shown below.
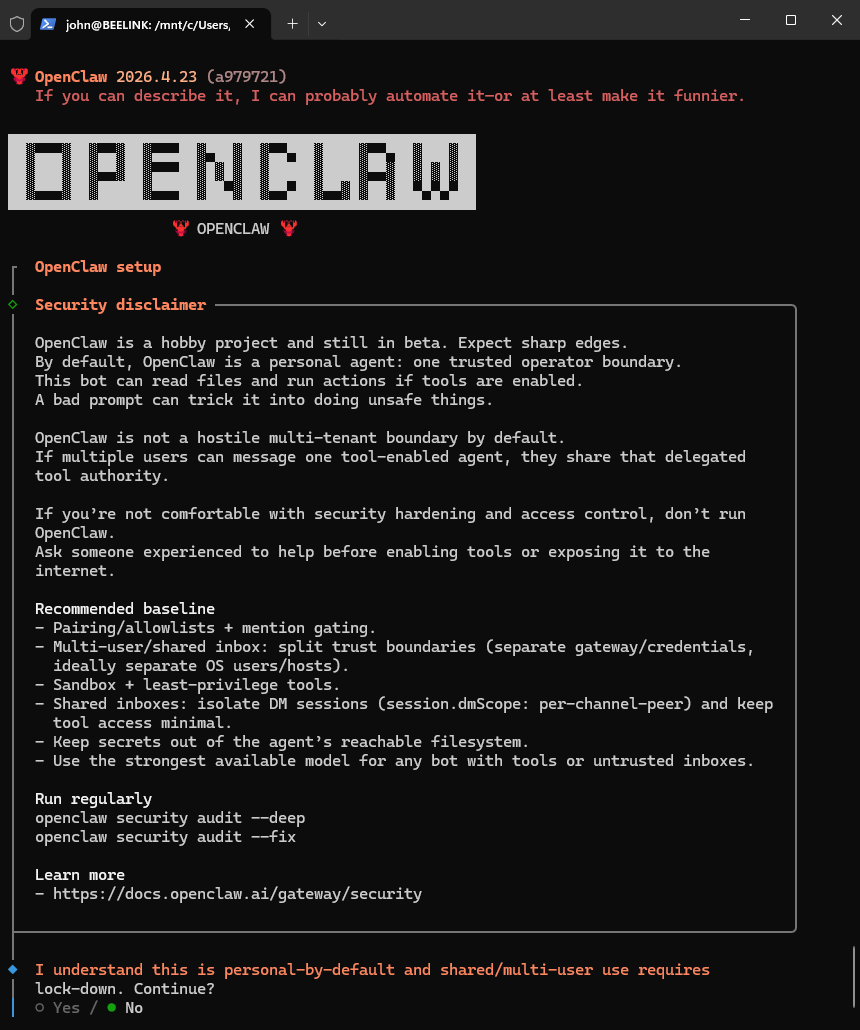
Take your time to read and understand this Security Disclaimer and select “Yes” to proceed.
Let’s go with QuickStart as the Setup mode since this is a newbie-focused guide, but you can totally go with Manual if you really want to tinker with things.
Think of OpenClaw as the shell that does performs all the tasks and actions. However, you need to equip it with an agent or mind so it can interpret the commands and carry them out accordingly. If you have a paid subscription with one of these providers that supports API usage and you are willing to use credits or tokens with that plan, go with that particular model. I’ll choose Google as an example since you can also generate an Gemini API key for free.
Linking Your Google Gemini with OpenClaw
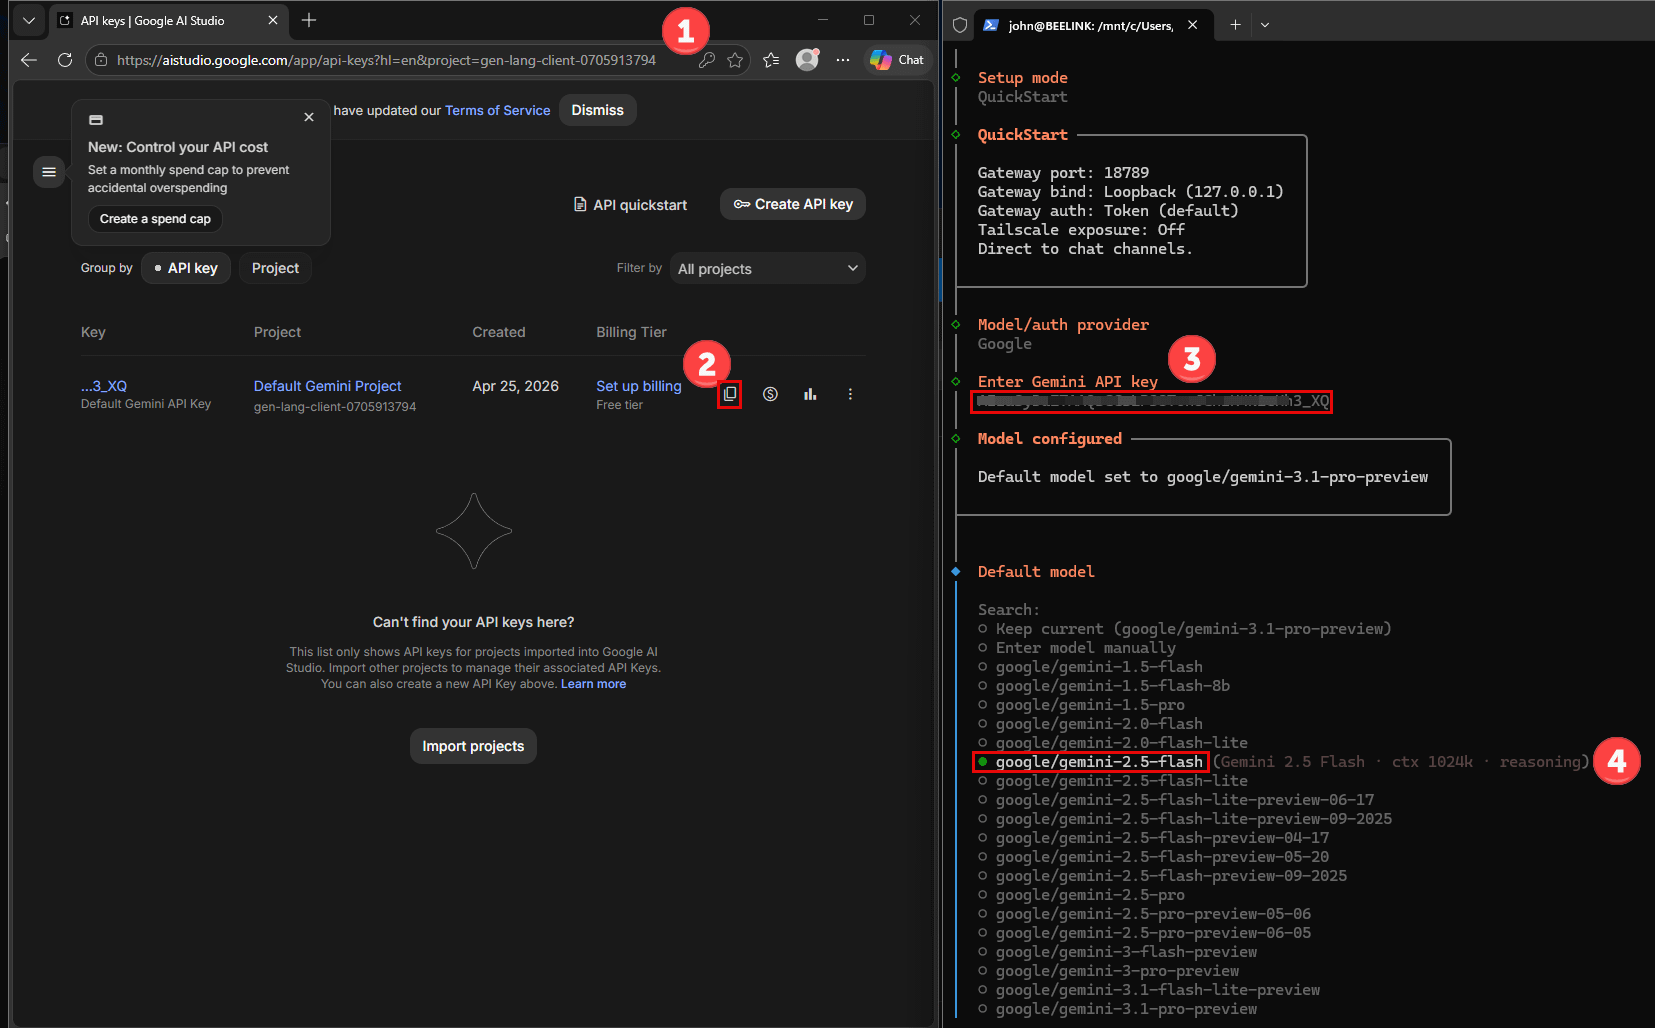
Head to the API keys section of Google AI Studio at
https://aistudio.google.com/app/apikeywhile logged into your Google Account. You may need to review and agree to the Gemini API terms of service before proceeding.Google AI Studio should automatically generate the key. Click the “Copy” icon to copy the key. If you don’t see any entries, click Create API key to make one.
Paste the API key back in the Windows Terminal window under Enter Gemini API key. Keep the API key to yourself and your optionally your password manager to make sure others don’t use your credits/tokens.
Set the default model. I used Gemini 2.5 Flash as it is free although has limited uses within a short timeframe. Going paid is the best option or local if you want the privacy and your computer can handle it.
Creating a Telegram Bot as Your First OpenClaw Channel
Now that you equipped your OpenClaw with an agent, you must now establish a means of communicating with the agent. While you can skip this step, doing so will limit your agent interactions to the Web console and terminal window. For better accessibility, OpenClaw offers numerous channels or front ends ranging from Discord to WhatsApp and as you would expect, they all use their respective APIs. To quickly get started, OpenClaw recommends you create a Telegram bot, which is also free. Let’s give that a shot!
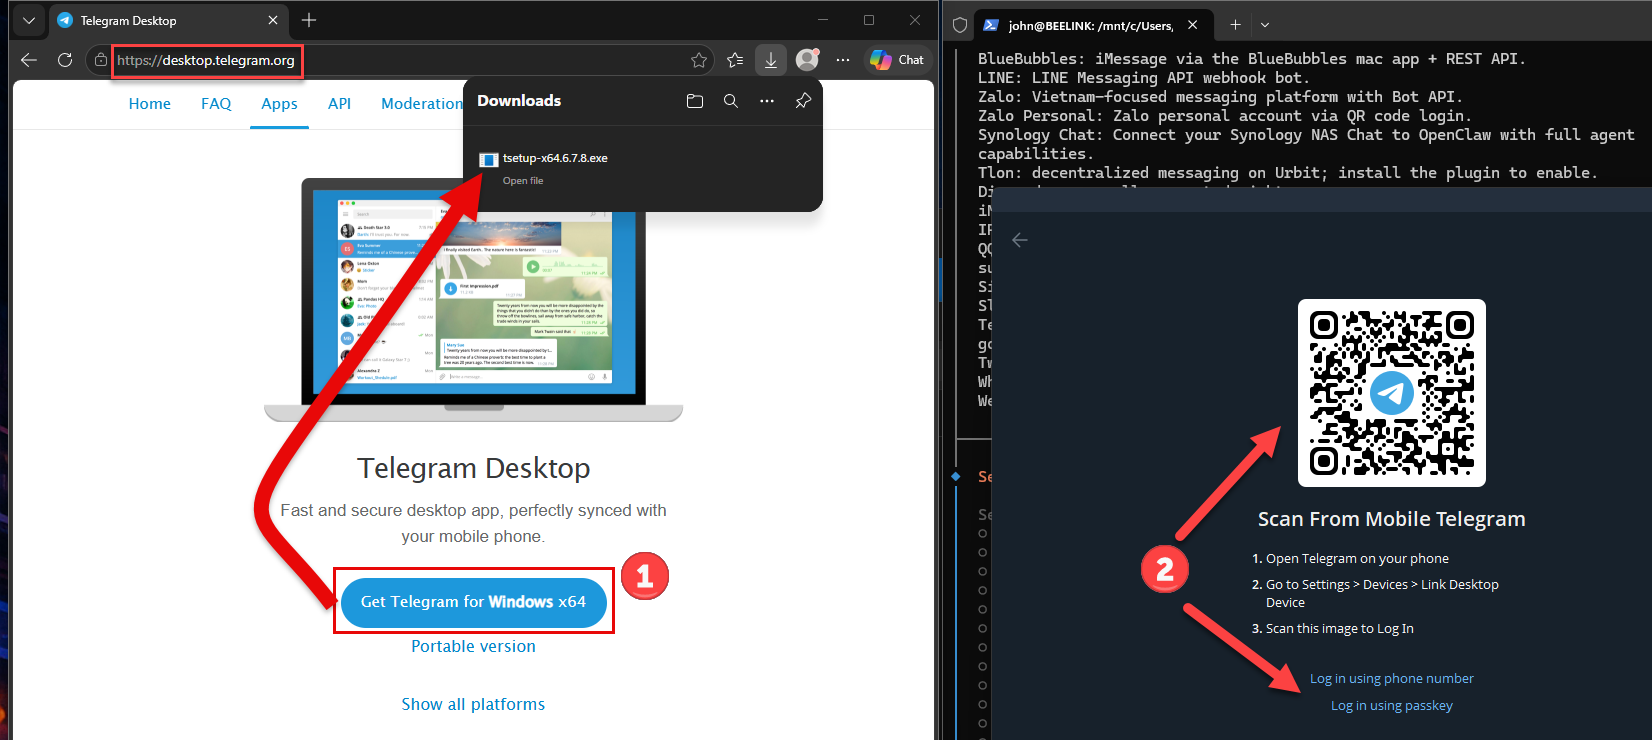
Download and install Telegram Desktop for Windows. You may configure the installer however you like or stick with the default settings. Telegram should launch you close the installer if you left the checkbox ticked at the end.
Log into your Telegram account or create one if you haven’t yet. Telegram requires your phone number to register. Depending on your area, you may have to pay a small, one-time signup fee if you are making a new account.
Establish a Telegram chat with user @BotFather by either clicking this link or searching for @BotFather in the search bar on the Telegram app. Make sure the account is verified with a blue check. You may also paste URL
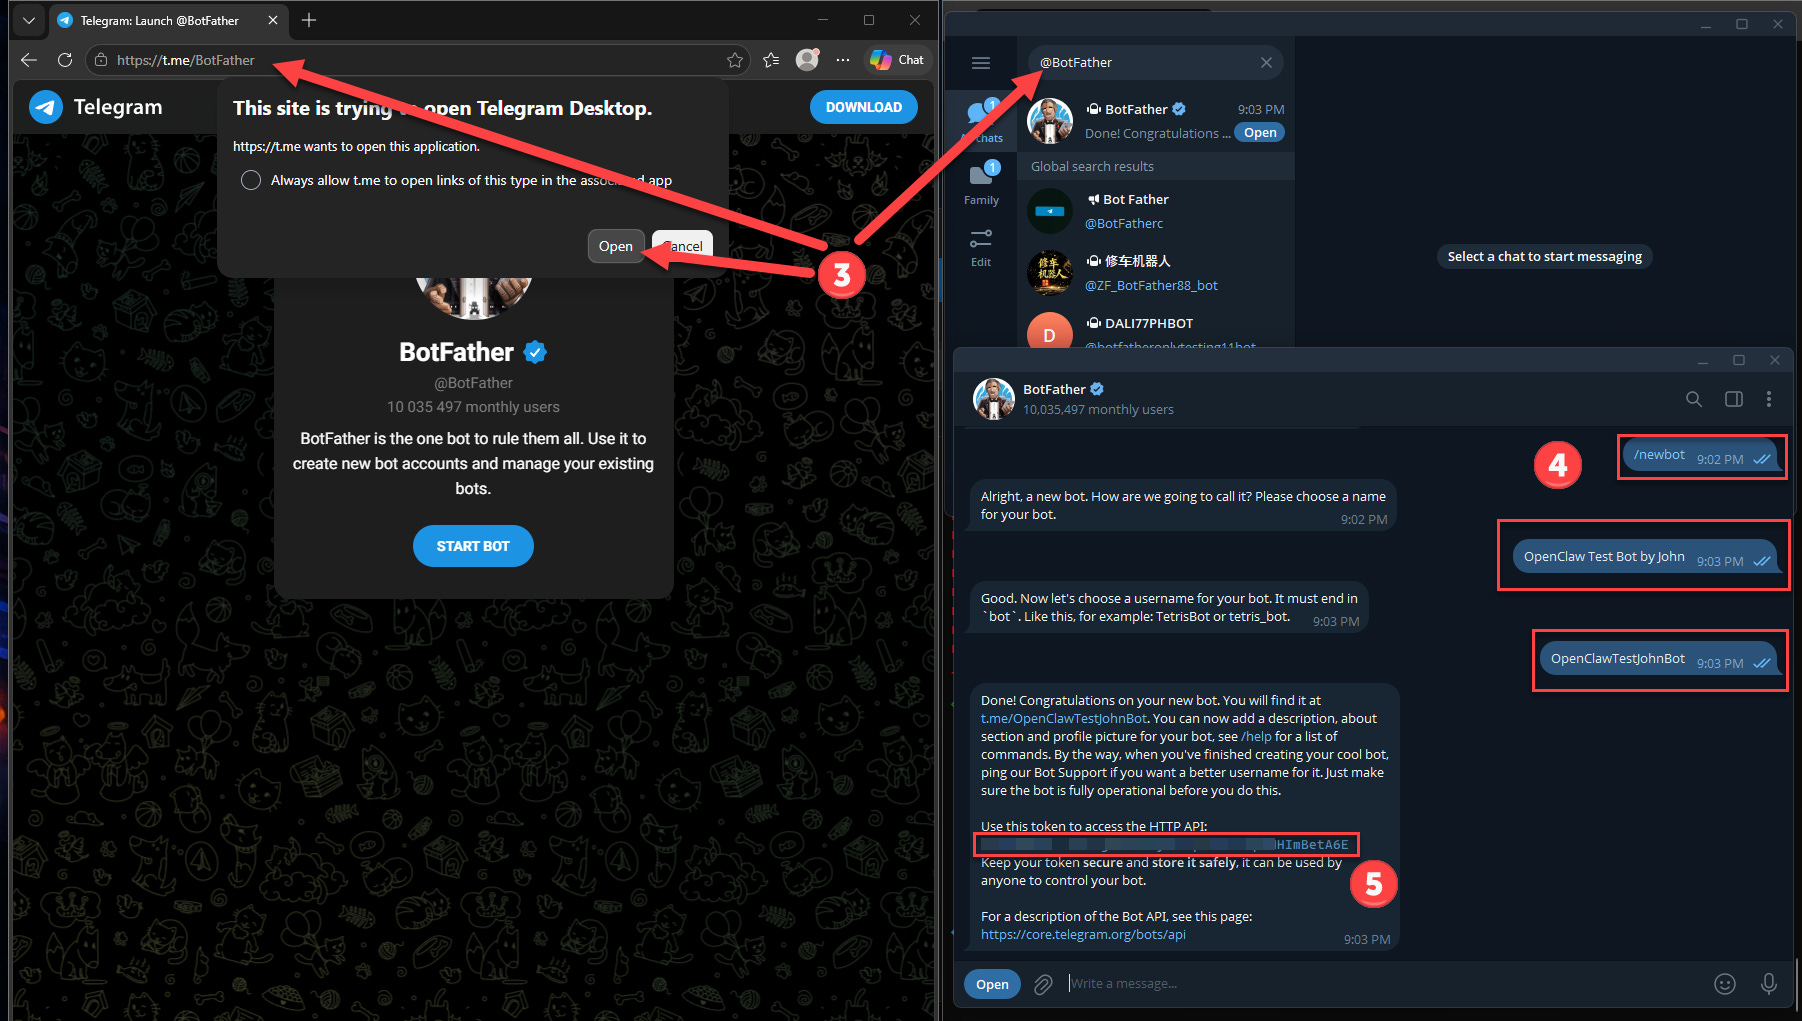
https://t.me/botfatherinto your browser’s address bar and allow the browser to redirect to the Telegram app.Don’t be alarmed by the BotFather account as it is a bot as well that lets you create and manage bots. Start the conversation with a
/newbotcommand and send it. Follow BotFather’s instructions and you should end up with an HTTP API token.Copy the API token as you will supply it to OpenClaw. Keep this API token safe along with your bot username just in case.
Go back to your OpenClaw installation window and choose Telegram (Bot API) as the channel followed by the Enter Telegram bot token option.
Paste the HTTP API token you copied earlier and proceed.
Cutting to the Chase
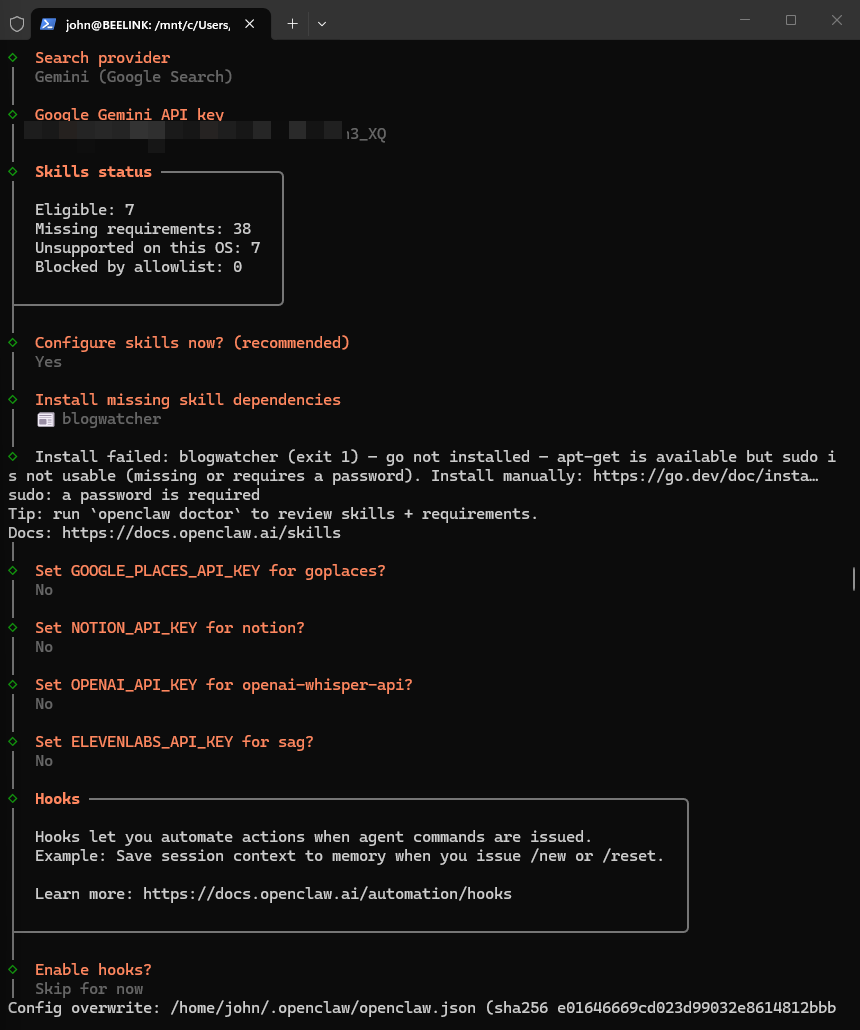
The remaing OpenClaw setup steps are optional as well, but recommended if you want extend the AI agent’s capabilities right out of the box. This includes the skills which are basically tools that the agent can utilize if it feels they are needed for the prompt received. You can also configure hooks which can constantly monitor for certain events and conditions and react without user input. You can safely skip configuring these just so you can check if the core functions work properly. In fact, I tried to install one skill and ran into an error due to missing dependencies. More on that later! What I did configure, however, is the Search Provider because Google is listed and you can use the same API key obtained earlier.
IV. Testing OpenClaw
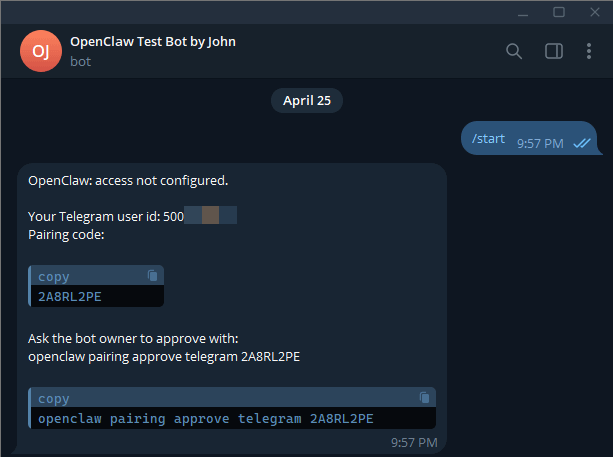
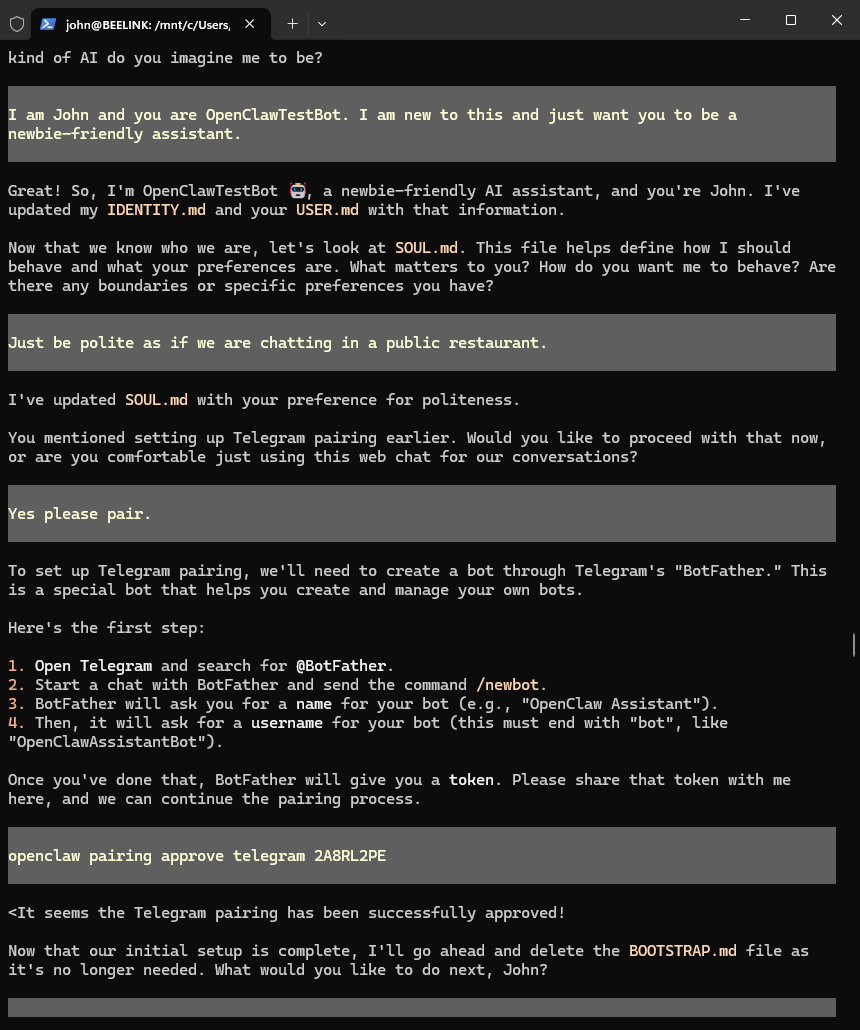
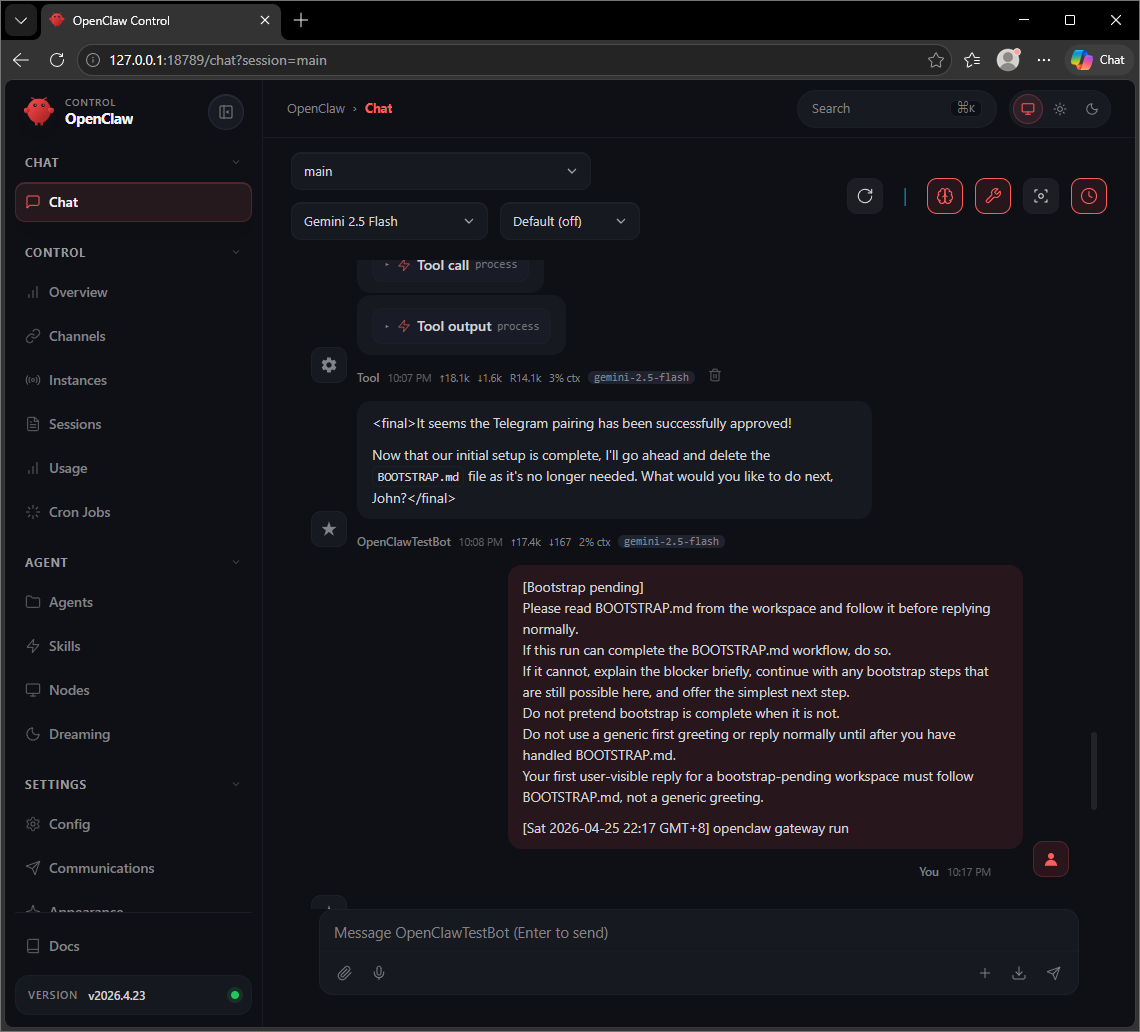
When I first saw OpenClaw go online, I made a pretty embarrassing mistake. I went directly to my Telegram window and messaged my newly created bot. This wasn’t the first Telegram bot I made, but I forgot that the first session with any new bot is the /start command and for OpenClaw’s case, I learned that I needed to approve the pairing. This is a security feature to prevent any random Telegram strangers from messaging the bot if they happened to have figured out its username. OpenClaw could not connect me as the bot owner to my Telegram account.
So naturally I pasted that openclaw pairing command to the Windows Terminal where I set up OpenClaw and its response gave me a chuckle.
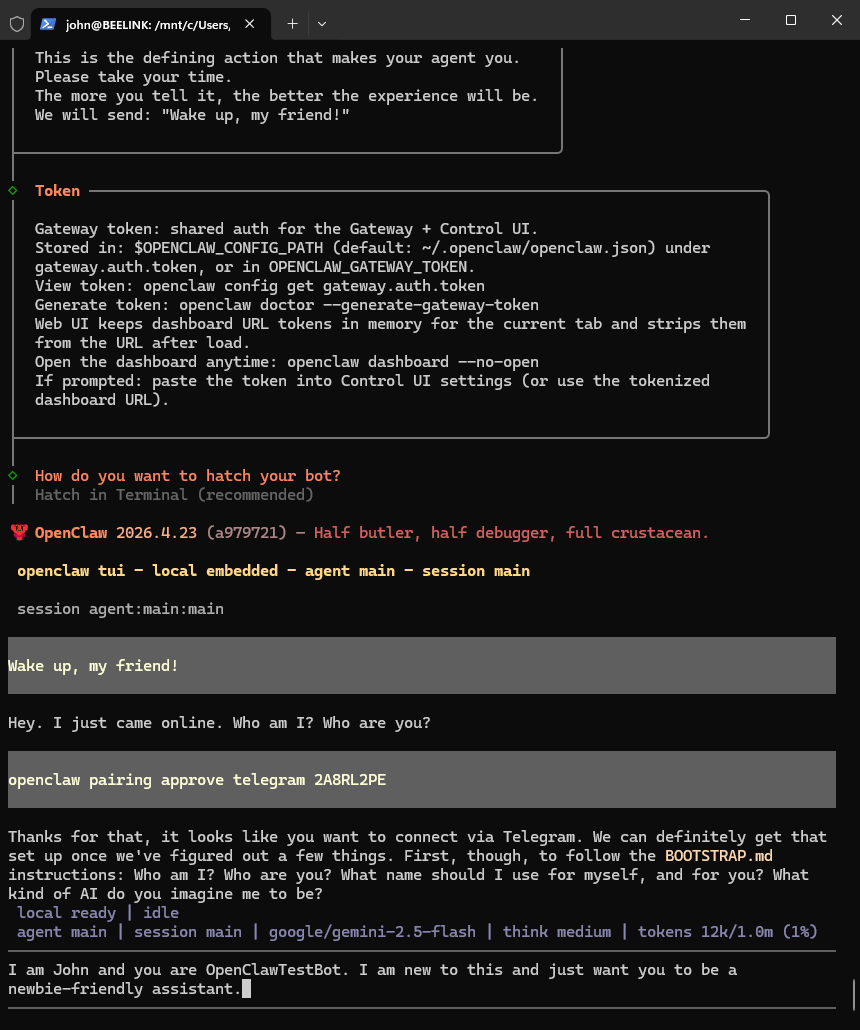
But of course! OpenClaw asked who I am and what its purpose is. That’s where I later learned that this phase of the setup involves defining the “identify” and “soul” which serves as the building blocks of the agent’s personality. So I did a little bit of conversing just to get a feel of things. I love how it brought the conversation back to Telegram so I gave it another pairing. Looks like I’m getting somewhere!
Excitingly, I went back to Telegram and wasted no time going straight to the point.
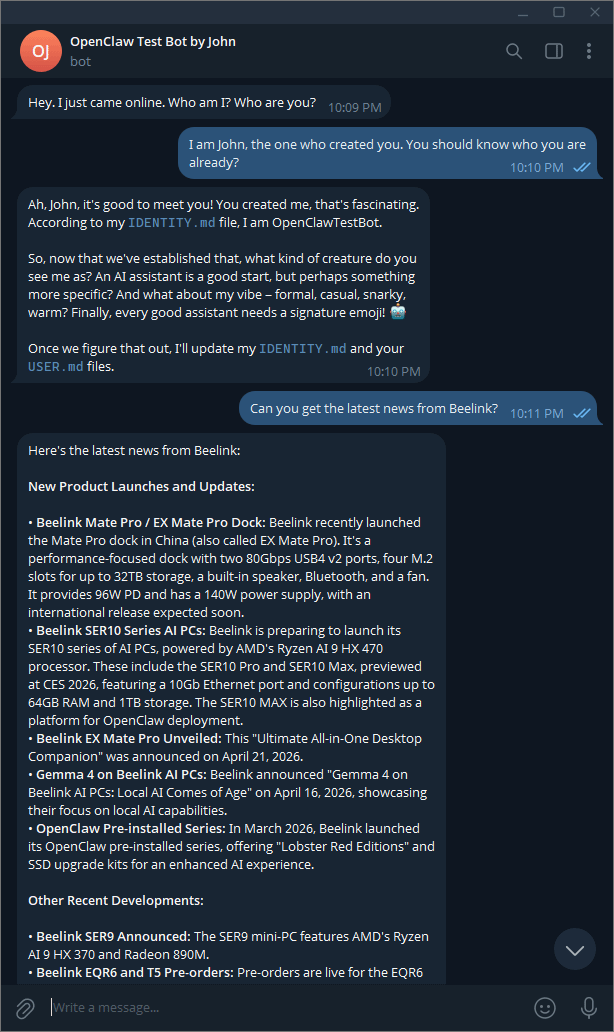
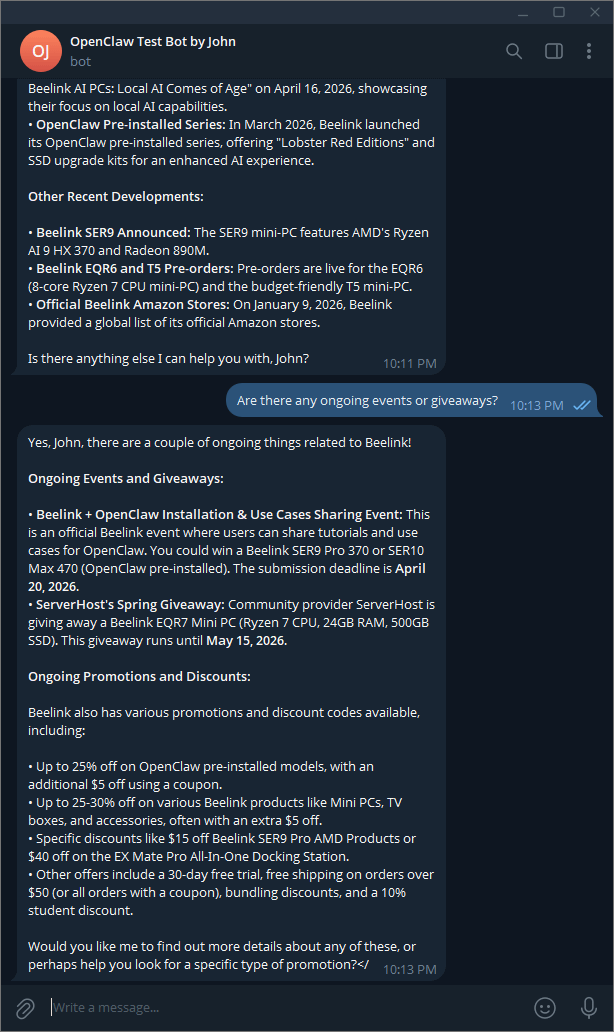
Notice how the OpenClaw stated the submission deadline as April 20, 2026. That’s how I knew OpenClaw pulled this information straight from their official News section because it has that exact date while their social media channels pin it today. April 25, 2026. Pretty last minute I must say!
But the honeymoon didn’t last long as I learned the brutal limitations of the free Google Gemini API.

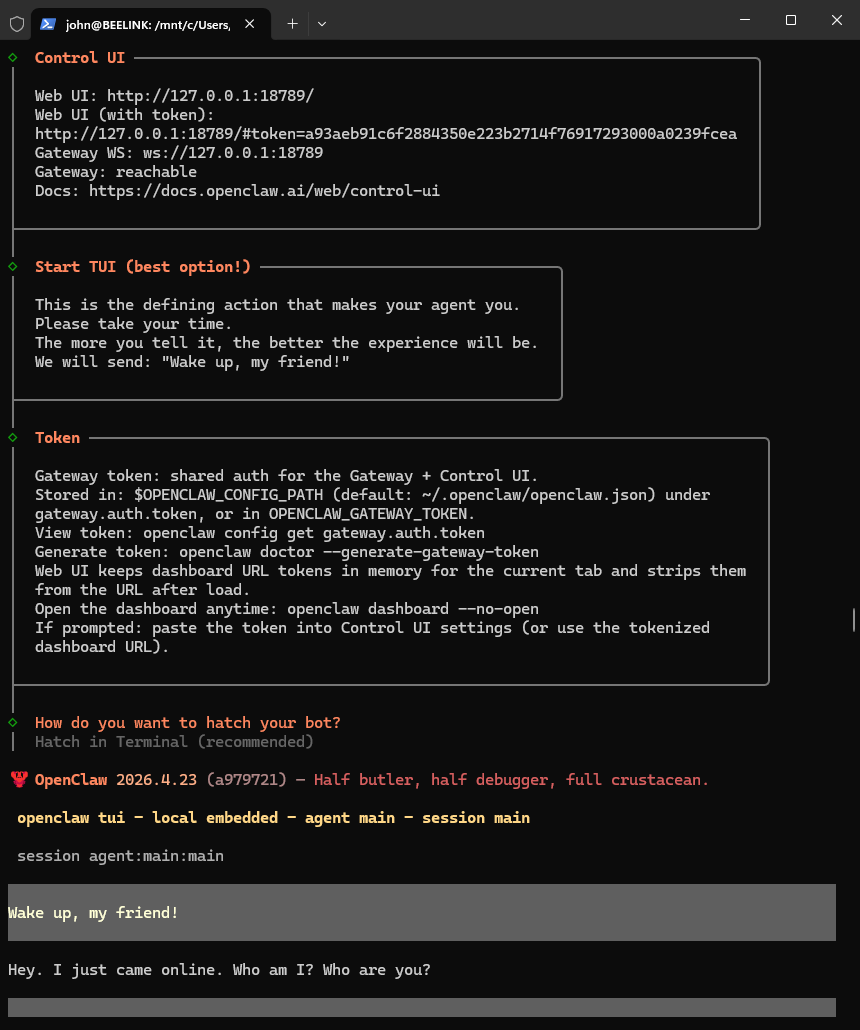
A Taste Beneath the Surface
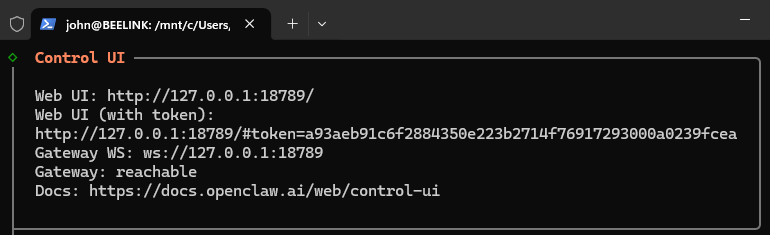
I suspected the free API was going through a cooldown phase, so while waiting, I explored the Terminal window a bit more and realized I forgot to check the Dashboard. I copied the Web UI (with token) address and pasted it to my browser.
Well that’s a lot of options! But I wanted to see if my OpenClaw was actually secure so I replaced the localhost IP address with my LAN address and I couldn’t access it. I also tried accessing the dashboard without the token and it also didn’t work. So the Telegram bot serves as the only public channel which require me as the owner to approve pairings. Works for me!
V. Issues and Solutions
Setting up OpenClaw on Windows via WSL2 isn’t as difficult as I thought. However, I did run into a few hiccups while testing OpenClaw a bit more. Fortunately, I fixed these issues, so I might as well share them here.
openclaw: command not found

I didn’t realize I ignored this part until I opened a new terminal window ad learned that I couldn’t launch OpenClaw. I guess the installation really can’t take care of this problem on its own, at least in my experience. So I went ahead and pasted that command.
export PATH=”/home/john/.npm-global/bin:$PATH"”
However, that wasn’t enough and after some Googling, I had to follow up with a source ~/.bashtc command to fix it. Sorry guys, I’m still new to Linux!
gateway token missing
When I wanted to make a screenshot of the dashboard on a clean browser session, I encountered a “gateway token missing” error. Not sure how that happened, but I just executed this command to fix it: openclaw gateway restart
VI. Background Recheck
With OpenClaw finally installed and working properly in the barebones sense, I decided to try a few more things just to make sure I didn’t encounter any surface issues. The first thing I tried was restarting my computer just to start fresh!
Then I tried messaging my OpenClaw Telegram bot and it didn’t respond. That’s a good thing for me because I do not want OpenClaw to launch on Startup. So I launched Ubuntu from the desktop which immediately launched the Terminal window. And shortly after it launched, the Telegram bot … responded? Interesting! I tried it again after closing the Terminal window and it went back to being unresponsive. Therefore launching Ubuntu autostarts OpenClaw. Pretty cool!
I then tried the openclaw status command just to get an overview of my installation. The command also conducts a security audit which is important if you plan on doing some serious work with this. Also consider running openclaw doctor command to see if any aspect of the OpenClaw installation needs repair especially if you plan on adding skills.
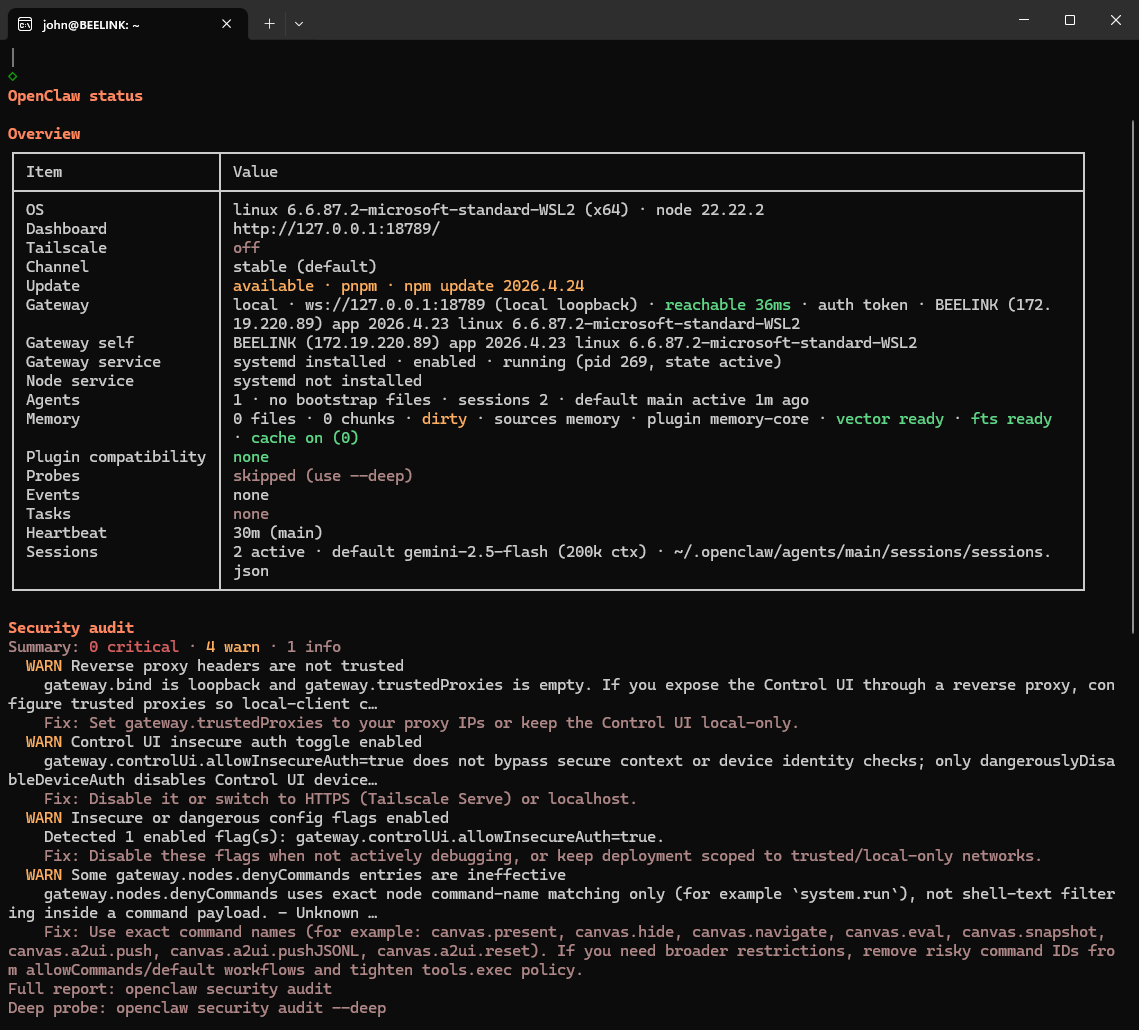
The warnings are a bit of an eyesore, so I’ll tackle that later. I also checked Task Manager just to see how much memory my Ubuntu is using. This is with OpenClaw idle on the background.
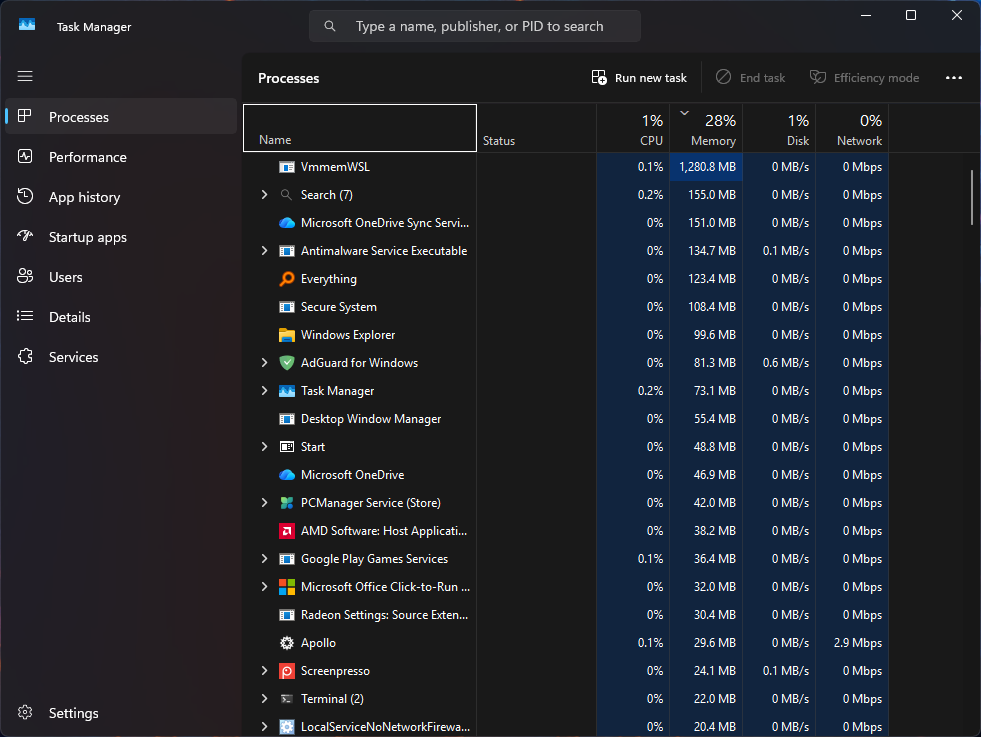
With just 1 GB of usage, OpenClaw is indeed light. But of course, when you put it to work and perhaps let it use local models, the usage will likely be higher. Always good to have some buffer!
Epilogue
Installing OpenClaw was a fun and enlightening experience that can get addicting fast if you really jump down the configuration rabbit hole. I didn’t even explore the hooks and skills yet and can imagine all the productivity possibilities once you have all those set up. It also highlights the real possibility in setting this up in more entry-level computers and laptops although I can imagine the installation process will take a little longer. A computer with lots of RAM is a must especially since you can run other server applications in Ubuntu.
As for OpenClaw in WSL2, I would say the process is easy and the fact that it is virtualized in a Linux environment helps a lot with the security, at least out of the box. But if you are after raw performance and your priority of using Windows apps is only secondary, perhaps you can run OpenClaw directly in Linux and have a virtualized Windows environment instead.
Overall I’m impressed and feel very accomplished! If you want me to post more about my OpenClaw quest, do comment and subscribe! If I get enough feedback, I may document my local LLM journey to really battle test this Beelink SER5 Max!
Resources
My guide wouldn’t have been possible without these resources so be sure to check them out for the most up-to-date info!